
Guest reading progress stays in this browser and is not synchronized to your account automatically. Use the learning panel to include browser marks and save them explicitly. Clearing site data removes browser marks.
Your learning notebook
Save courses and review situations deliberately. Load your account records on another device when you want to continue.
Bookmarks and review choices stay in this browser until you load and save an account. Answers and time spent reading are not recorded.
Saved courses
Saved situations to revisit
Find your marked situations by title or topic, then open the original question and explanation.
Your review choices will appear here when this learning view is ready. Use the account controls above to load account choices.
No situations are marked for review in this learning view.
No saved situation matches these filters. Clear the search or choose all topics.
Identification practice
Land access practice
Field decisions practice
Harvest care practice
Useful reading before this lesson
Start with these guides for background and preparation. You can open any guide at any time.
Watch the narrated field lesson · English narration · subtitles in four languages ↓
Brief the outing · Canada Goose
A compact dry-field visit based on a recent observation, with the agreed entrance, parking and equipment-removal route.
An original planning summary to use with the full lesson. Check current law, permission, identification and local conditions separately; this card does not establish readiness or eligibility.
Open the briefing and field checks
Three tools and their jobs
- Binoculars: compare the present field with the earlier observation from a permitted position.
- A small decoy kit: practise handling before adding volume.
- Field sketch and pencil: mark entrance, equipment groups and the return corridor without claiming an animal route.
Rehearse the complete visit
- Before leaving: Bring the date and viewpoint of the earlier observation; record what was actually seen rather than expecting the same use today.
- On arrival: Check whether livestock, farm work or changed access now affect the planned part of the field.
- Brief and organise: Keep the compact arrangement and movement plan understandable to every companion; maintain room for an orderly return.
- Return and review: Remove the whole setup and compare today’s conditions with the earlier note before deciding on another visit.
Two avoidable mistakes
- Treating yesterday’s field use as a guarantee can keep the team waiting at an unsuitable site.
- An elaborate arrangement can hide a simple access or visibility problem.
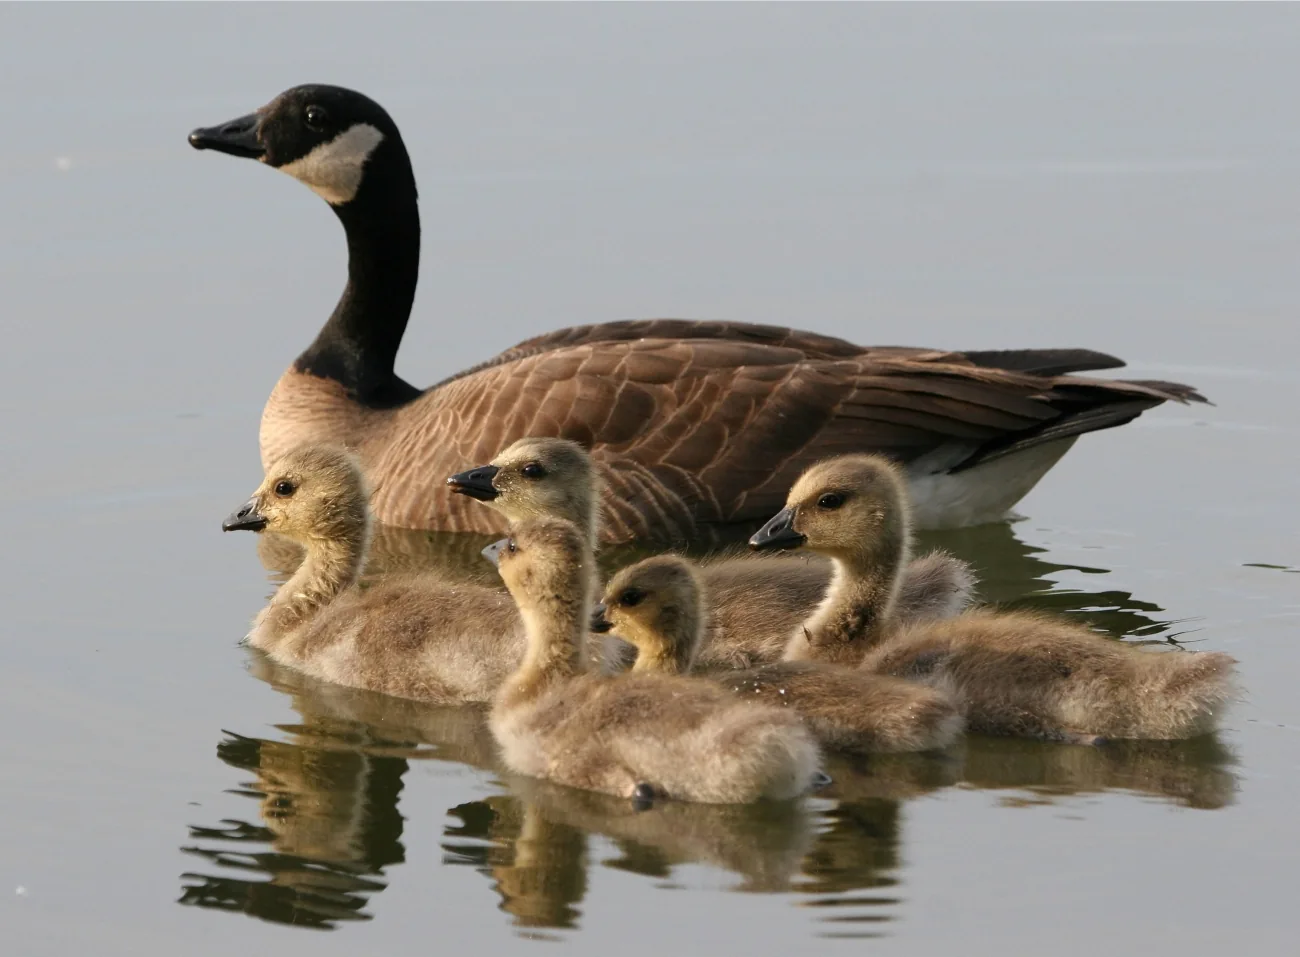
Representative photograph from the credited source, taken outside Saskatchewan. It is not a current sighting, a distribution map or a complete identification guide. This is one example from a wider bird group; other species, ages and plumages can look different.
Image credit: Donna A. Dewhurst/USFWS · Public Domain · View image sourceWhat you will learn
- Turn a recent feeding observation into a safe hide and an open approach, rather than starting with a memorized decoy shape.
- Choose a manageable Canada Goose kit and distinguish essential functions from optional equipment.
- Use a pause–check–change routine to adjust the setup and recover birds without losing track of people or dogs.
An original SKHunter learning guide
1. Read the field before committing the equipment
This course starts after access and trip preparation, on an authorized harvested dry field. The feeding hotspot, sometimes called the X, is a recent observation rather than a permanent map feature. Record where birds actually touch down, how they arrive and which parts of the field they use. A large flock seen overhead is less useful than a clear account of repeated feeding visits.
Treat the arrival as a fresh site check. Wet ground, farm work, livestock, another party or a changed wind may make the previous plan unsuitable. Compare a concealed position with the observed feeding area and the available approach. If those needs cannot fit inside the permitted and safe area, choose another agreed location or leave; a convincing spread cannot solve an unsuitable site.
2. Give the birds a believable place to arrive
Canada Goose field decoys can represent small feeding groups; an enormous white-flock presentation is not the starting point for this lesson. Silhouettes pack easily, full-bodies offer a three-dimensional profile and shells can represent low resting birds. Each brings handling and storage trade-offs. As an optional carrying example, one or two participants might test roughly 12–36 decoys; this is neither a minimum nor a promise of results.
Choose the open landing pocket before placing the first decoy. Geese commonly approach into the wind, so keep a usable downwind entry and put loose feeding groups around the space rather than across it. Match the appearance to birds recently observed: warmer conditions may show more separated groups, while colder birds may bunch or rest. Preserve room to arrive even when depicting a concentrated flock.
3. Make the group, not the gear, the control system
Assign a coordinator, an observer and a retrieval lead; a small party may combine roles. Every person must understand the safe directions and the stop signal. A helper putting out decoys, calling or retrieving must not be assumed exempt from licence or participation requirements. All setup and position changes happen with firearms unloaded; readiness is confirmed only after the group is back in its agreed places.
Watch one approach at a time and describe the response before choosing a change. A manual call or flag is optional, and more sound or movement is not automatically the answer. Keep the existing wind, bird approach and hide in the observation record, pause the entire group before anyone moves, then alter one feature. The aim is a clearer decision process and responsible recovery, not a guaranteed bag.
Intermediate fieldcraftAfter permission · dry harvested fields
Use this sequence for a licensed, prepared small party on a permitted harvested dry field. It combines general fieldcraft research with an original SKHunter workflow. Counts and layouts are teaching examples; check the current Saskatchewan and federal requirements separately. The permission, safe directions and ability to recover birds govern every step.
Choose a workable kit
| Item | Priority | What it does | Practical choice / alternative |
|---|---|---|---|
| Permission record and offline field map | Core kit | Identify the allowed entry, field limits, excluded areas and agreed parking; preserve a way home without reception. | A readable printed map and written notes can replace a second mapping device. |
| Binoculars and a small observation notebook | Core kit | Check birds and field activity from a distance; note approach, actual landing point, wind and the result of each change. | Use simple binoculars already owned; a paper notebook avoids a glowing phone screen. |
| Headlamp, charged communication device and return plan | Core kit | Carry and collect equipment safely in low light and contact the agreed person if the plan changes. | Choose simple reliable equipment with spare power; do not rely solely on mobile reception. |
| Weather layers, eye/ear protection and first-aid supplies | Core kit | Prepare for warm work followed by cold waiting, protect participants and respond to minor problems before they grow. | Use suitable outdoor clothing you already own; keep a dry layer protected from mud and moisture. |
| Manageable Canada Goose decoys and their supports | Core kit | Represent the observed flock while leaving an open arrival area. The optional 12–36 example is a carrying exercise, not a requirement. | Borrow a small coherent set. Silhouettes save space; full-bodies cost more carrying volume; shells offer another low-profile option. |
| Low-profile hide and suitable camouflage | Core kit | Reduce the outline of each person and cover conspicuous equipment without blocking identification or safe movement. | An authorized natural field-edge position may replace a layout blind. Obtain separate consent before cutting material or disturbing ground. |
| Practised manual Canada Goose call and a flag | Optional | Offer a controlled sound or brief visible movement when observation suggests it may help; one designated operator keeps responses interpretable. | A quiet setup on an observed feeding location is a valid starting point. This course does not call for an electronic caller. |
| Spare supports, small repair kit and cleaning cloth | Optional | Replace a failed stake and remove mud or moisture that changes the decoy appearance without rebuilding the whole rig. | Carry fewer working decoys rather than leaving broken parts in the field; store small items in one counted pouch. |
| Retrieval, bird-care and cleanup kit | Core kit | Plan humane recovery, clean handling, cooling appropriate to the weather, legal identification during transport and removal of all litter. | Choose a manageable dry-field location if safe retrieval equipment or access is unavailable; a dog is not a substitute for a safe plan. |
Compare the equipment forms
Look at body shape, support and carrying volume before choosing a manageable combination. A decoy represents a bird; it does not replace the site observation or the open landing space.
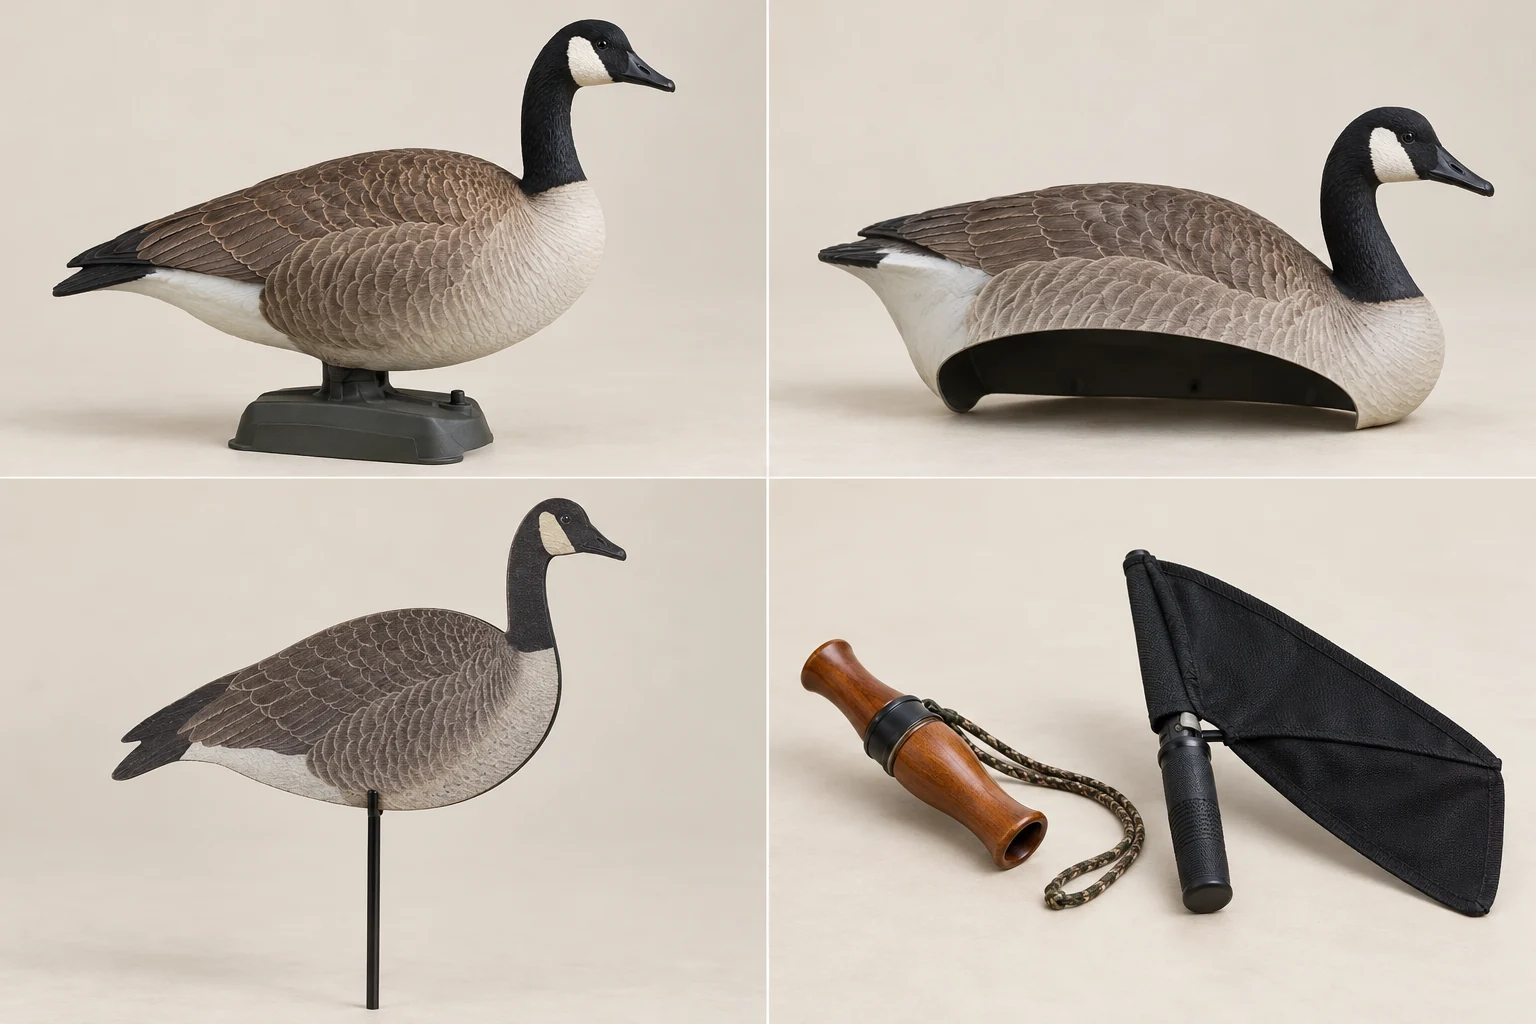
Full-body Canada Goose decoy
The three-dimensional body presents a recognisable shape from several viewing angles. Its carrying volume can limit the number a small group can manage. Choose poses and spacing to resemble the observed birds and preserve usable landing room.
Shell Canada Goose decoy
A shell presents a low body profile and can represent a resting posture. Stackable examples can be easier to transport than the same number of full bodies. Compare the pose with the birds on that day and check the support rather than assuming every shell behaves alike.
Flat Canada Goose silhouette
A thin profile with contrasting markings offers a compact carrying option. Viewed edge-on, it becomes much less visible than a full-body model. Mix viewing angles deliberately and assess the whole group from outside the setup during a safe pause.
Mouth call and hand flag · optional
These manually operated tools add sound or visible movement when the response justifies them. Let one designated participant make simple, controlled changes and reduce unnecessary movement as birds approach. The pictured mouth call and folded flag do not include an electronic playback device.
SKHunter · AI-generated teaching illustration · Teaching illustration · not to scale · no distances implied
View the larger illustration ↗These examples explain forms and functions. Choose equipment around the actual field, permission conditions and what your group can carry and retrieve.
Read the field layout
Symbols show relationships, not a required decoy count.
- Decoys: vary small groups and density to match observed birds.
- Landing space: leave an open entrance and usable room.
- Hide: this side position is an example; actual cover and safe directions decide.
- Likely approach: an observation to check, not a promised flight path.
- The diagram shows relationships, not a measured shooting plan: wind, likely approach, an empty pocket and a hide offset to suit the actual site.
- Keep a continuous downwind entry toward the pocket. Decoy groups illustrate feeding birds; empty space is a deliberate part of the arrangement.
- Never copy the hide location if roads, people, livestock, another party or boundaries make its directions unsafe. Any position change requires a fresh group check.
From arrival to pack-out
Stop at the agreed entry and check the whole site
Keep the equipment packed while confirming that today’s field still matches the permitted plan.
- Locate people, livestock, buildings, roads, field workers and other hunting parties before choosing a position.
- Check ground firmness and the parking agreement; permission to hunt does not automatically allow vehicles across a wet field.
- Observe from a distance. Do not drive through feeding birds merely to reach yesterday’s GPS point.
Read today’s wind and choose the hiding position
Identify a workable hide, an open approach and a safe background together.
- Use an observed wind indicator and check again after walking into the field; sheltered edges may differ from the road.
- Compare the chosen low spot or cover with the true feeding hotspot; do not trade away safety to sit exactly on the X.
- Consider the sun and visibility for species identification. If the only concealed position points toward hazards, reject it.
Assign jobs and lay out the carrying area
Name the coordinator, observer and retrieval lead before spreading equipment across the field.
- Confirm the eligibility of everyone participating, including people helping with decoys, calls or recovery.
- Keep firearms unloaded during setup and movement; place equipment so no person must step across another person’s position.
- Count decoys, supports and bags on arrival. Keep unused bags, bright packaging and spare items in one concealed collection point.
Build outward from the empty landing pocket
Leave a clear entry from the expected approach and arrange small irregular groups around it.
- Use an open two-group, U or V arrangement as a starting sketch, not a mandatory pattern or an exact scale.
- Keep the entry and central pocket empty; check that a nearby row of decoys does not quietly close the route.
- Vary spacing and facing to reflect recently observed feeding birds; account for how silhouettes look from different approach angles.
Recognise the tools. Understand the setup. See what changes when the hide blends in
Compare the same unoccupied hide from the same direction. Inspect its outline, fabric contrast, opening and loose equipment before working on the decoy pattern.
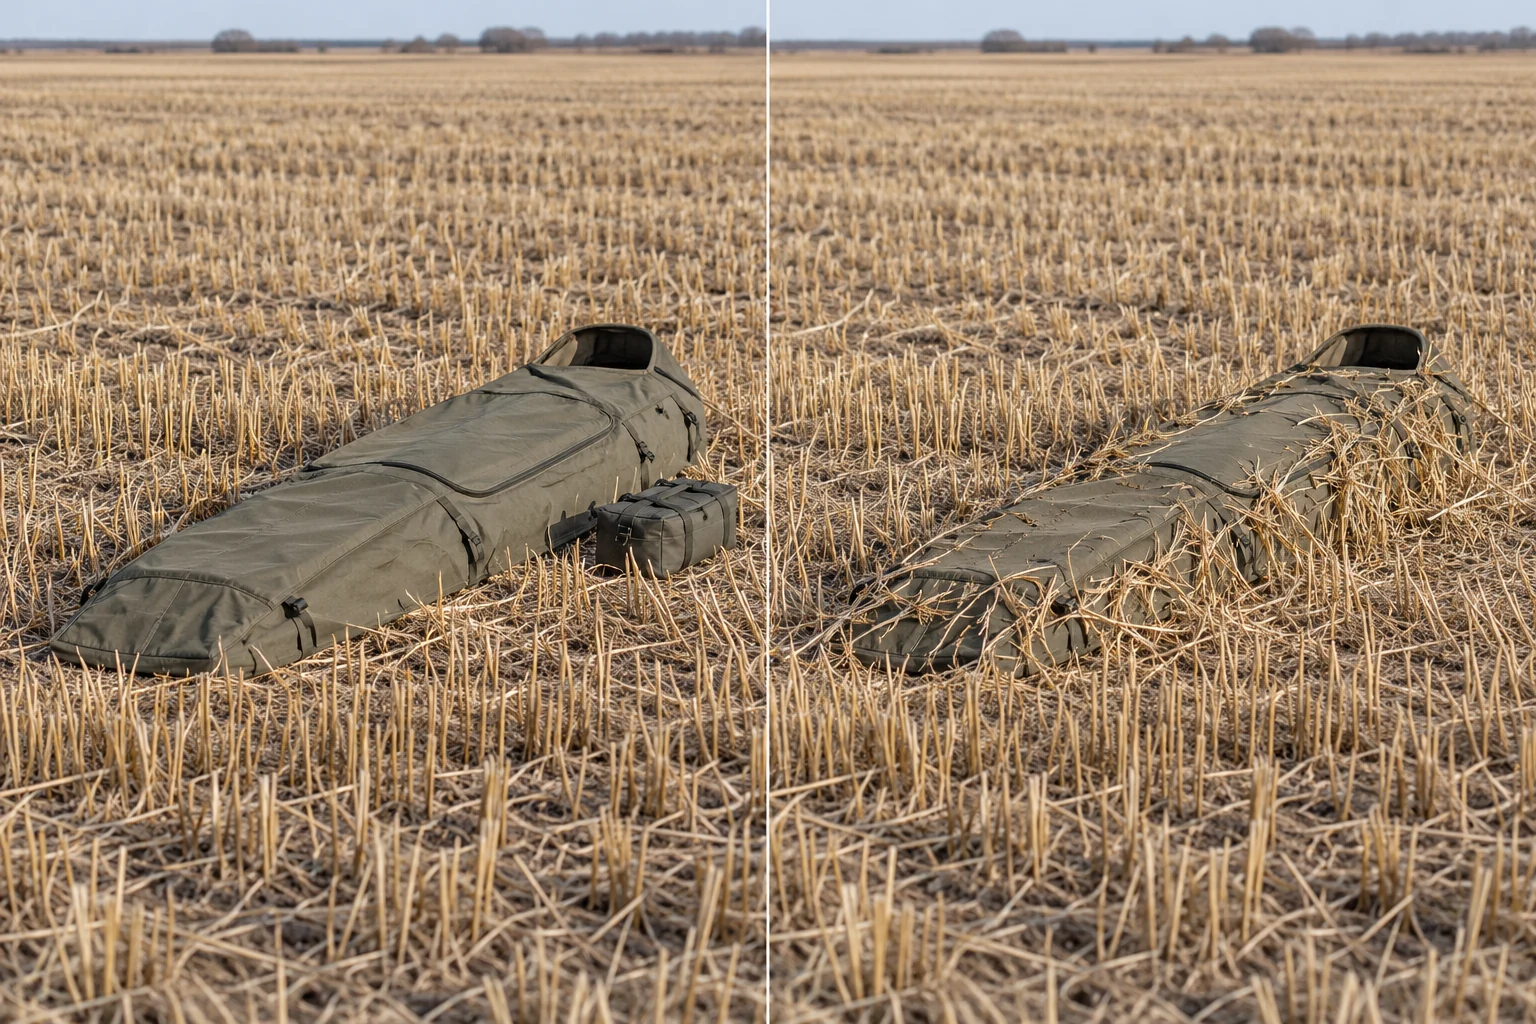
Before: visible outline and loose equipment
The smooth fabric, raised edge, dark opening and bag give you several contrasts to inspect. Their visibility depends on light, background and the direction from which birds approach. Use this as a checklist of things to examine, without treating one feature as proof of why a flock turned away.
After: matching texture with a clear opening
Sparse matching stubble breaks up the surface and outline while the loose bag has been removed. Use only materials permitted by the land-access conditions and keep observation and equipment access clear. Recheck the result from the likely approach side during a safe group pause, especially when the light changes.
SKHunter · AI-generated teaching illustration · Teaching illustration · not to scale · no distances implied
View the larger illustration ↗Review concealment from outside the hide
Have a teammate inspect the setup from the expected approach while everyone remains in setup mode.
- Look for a raised blind outline, bright face, reflective lenses, bare bag or a colour that contrasts with the field.
- Use only permitted camouflage material. Keep openings sufficient to see, identify birds and move safely.
- Check decoys for frost, wet shine, mud and unstable supports; repair the obvious problem before adding more decoys.
Complete a group readiness check
Confirm positions, communication, boundaries and the recovery plan before anyone starts hunting.
- Agree who coordinates decisions and the words that mean stop immediately; anyone may call a stop.
- Confirm personal safe directions and excluded areas. A coordinator’s call never replaces each participant’s identification and safe decision.
- Know how to pause for a person, dog, vehicle or livestock entering the area; start only when all participants confirm readiness.
Observe approaches and use restrained signals
Let the observer describe what birds do while the group keeps movement and communication controlled.
- Notice whether groups ignore the field, turn toward it, circle or repeatedly choose one side; record behaviour rather than assuming a cause.
- If using a manual call or flag, give one operator that job. Reduce unnecessary movement as birds settle into an approach.
- Do not pursue uncertain identification or unsuitable opportunities. Pause the group before any person or dog leaves the agreed position for recovery.
Pause, diagnose and change one feature
When a repeated pattern suggests a problem, stop hunting and make the next test deliberate.
- Unload and confirm the whole group has paused before entering the decoys or changing a hide.
- Check current wind, open entry, reflections and visible people before blaming decoy quantity; change one relevant feature.
- After a move, reconfirm positions and safe directions. Record the next responses without treating one flock as proof.
Recover responsibly and leave a counted field
Complete recovery and bird care before the final equipment sweep and departure.
- Keep everyone aware of recovery activity. Do not cross into another property, unsafe water or ice without a lawful, safe plan.
- Follow current handling, identification and transport rules; match cooling and storage to actual conditions.
- Count every decoy, stake and bag, collect spent cases and litter, restore agreed gates and parking, and record a useful lesson for the next visit.
If the birds do not respond
Observe → change one thing → observe again
One adjustment, shown step by step
After pausing the group, check whether loose decoys are closing the entrance. This is one possible cause to test, not a diagnosis of every bird that turns away.
Before · the entrance is crowded
The highlighted decoys occupy the approach to the landing pocket. Check the whole pocket from a lawful observation position.
After · open a continuous entrance
Move only those decoys to the outer groups. Keep the hide and other factors unchanged while observing the next comparable approaches.
Orange shows the decoys being checked and moved. The hide stays in the same position.
Pause and make equipment safe before anyone changes position. Teaching example · not to scale · no prescribed shooting distance
| What you observe | Check first | Make one change |
|---|---|---|
| Birds pass without turning toward the field. | Are these birds actually using this field, and is the setup visible from their approach? | Recheck the recent feeding evidence and permitted position before buying scale or calling harder; another agreed location may be the better answer. |
| Birds approach but consistently turn away close to the hide. | Inspect people, blind outline, reflections, movement and any blocked entry from the likely approach. | Pause and correct the clearest visible problem; reduce unnecessary signalling and compare subsequent groups. |
| Repeated groups land beside or short of the intended pocket. | Compare today’s wind and shelter with the landing point; check whether the pocket looks occupied. | Within the safe permitted area, test a clearer or reoriented arrival space rather than extending the attempt beyond a responsible opportunity. |
| The wind turns and the original approach crosses a hazard. | Does the new direction still fit the background, group positions and property limits? | Stop, unload and redesign the positions only if a safe alternative exists; otherwise end the session. |
| Calm conditions, frost or glare make the spread look different. | Look for shiny surfaces, rigid or unnatural presentation, and birds changing their arrival direction. | Clean or remove the distracting element, improve the hide and use only optional movement that matches conditions; do not assume more motion is better. |
Open the field reference card
- Stop at the agreed entry and check the whole site
- Read today’s wind and choose the hiding position
- Assign jobs and lay out the carrying area
- Build outward from the empty landing pocket
- Review concealment from outside the hide
- Complete a group readiness check
- Observe approaches and use restrained signals
- Pause, diagnose and change one feature
- Recover responsibly and leave a counted field
Before the next outing
A useful Canada Goose setup is one you can carry, conceal, explain, adjust and completely recover. Recent observation and a coordinated group matter more than meeting a decoy count.
Worked example: a small party and a changing approach
Two eligible participants have permission for a harvested field and a modest set of Canada Goose decoys. Yesterday birds fed near a shallow dip. Today the wind turns while repeated groups begin landing beside the original pocket. This is an editorial teaching example, not a report of a particular hunt.
Put it into practice
- From the approved entry, confirm the dip, today’s wind and a safe approach; keep the alternative field position within the permission already obtained.
- Place the hide where its profile blends, leave an obvious entry and arrange loose decoy groups around an empty landing pocket.
- Record that several groups favour the same side. Pause, unload and check wind direction and concealment before changing anything.
- Reorient the pocket only if the new position remains safe; agree the new positions and directions, then observe the next groups and record the result.
Common mistakes to avoid
Buying volume before understanding the field
A larger rig also means more carrying, setup and cleanup. Start with equipment the group can deploy and recover properly, then expand only when observations show what function is missing.
Filling the intended arrival space
An attractive-looking photograph of a dense spread can hide the practical problem: there is no continuous entry or room to settle. Inspect the pocket from the expected approach before hiding.
Changing several things while people are still hunting
Moving a hide, adding noise and sending someone out together obscures both safety and the reason for any response. Stop first, make one considered change and confirm everyone is back.
Several groups consistently land beside the pocket after a wind change. What is the best next step?
- Add louder calling immediately and send a helper to move the nearest decoys.
- Pause the group, unload, check wind and concealment, then safely change one feature and reset the agreed directions.
- Keep the original setup because its U shape was correct at the start.
Show the answer and explanation
Answer: B. Pause the group, unload, check wind and concealment, then safely change one feature and reset the agreed directions.
A changed response is evidence to investigate. A coordinated pause protects people and makes a single adjustment easier to assess; the shape alone does not establish that the location still works.
Five decisions from arrival to return
Work through a complete example, then transfer the equipment and review steps to your own outing.
Watch the narrated field lesson
Original teaching animation with Kokoro synthetic English narration and conceptual diagrams. Credited wildlife photos are representative, not footage of this procedure. English narration · subtitles in four languages
Use the transcript if video playback is unavailable.
Confirm the exact field arrangement
At the agreed entrance, confirm the parcel, people, activity, date and permission conditions. Parking, unloading and later recovery must fit the same arrangement. A familiar contact or old visit does not establish the current scope. Keep the return route and a contact method available before the group spreads out.
Practical actions
- Match approach and parking to the permission record.
- Keep boundaries and conditions in writing.
- Agree which changes would end the outing.
Read feeding groups and approach separately
From an authorized position, use binoculars to record feeding locations, small-group spacing and travel direction. Check whether the observation repeats. Wind at field level, vehicle access and keeping every group member accounted for are separate checks. None of those conditions can be read from a representative Canada Goose photograph.
Practical actions
- Record several observations with times and conditions.
- Separate feeding evidence from approach assumptions.
- Check the wind at the intended working area.
Keep the groups loose and the working space clear
Start with manageable decoy groups and visible space between them. Inspect whether direction and posture match your observations. Preserve routes for people and recovery, keeping every part inside the agreed scope. More equipment can make adjustment and collection harder, so inspect the first arrangement before enlarging it.
Practical actions
- Use small groups with purposeful gaps.
- Check appearance from a lawful outside viewpoint.
- Organize bags, loose equipment and movement routes.
Diagnose before adding equipment
When travel patterns or visibility change, pause and record the evidence. Check wind direction, the group's visibility and the spread's appearance separately. Moving people or equipment calls for new access and recovery checks. Compare another observation without promising that a particular shape or call will determine the response.
Practical actions
- Change one feature and note the time.
- Use comparable observation language before and after.
- Shorten the plan if the return option deteriorates.
Finish with complete records and recovery
Account for every person and item before leaving the permitted area. Link harvested birds to the correct person and handling record, checking current identification and transfer requirements before packaging. Save useful observations even when the expected pattern did not occur. Prepare the next visit from these facts and a new permission check.
Practical actions
- Reconcile equipment and the return contact.
- Keep bird identity and handling records connected.
- Save one evidence-based change for the next plan.
Try a different wind direction
Rotate the arrow and compare it with the open working area. The field outline, entry, return route and decoy positions are teaching examples.
Original schematic · check actual ground, permission and recovery
Build your task-based kit
- Confirm the exact parcel, visit date, people and permission conditions.
- Keep the checked entrance, parking and return route available offline.
- Agree a return-time contact and conditions for ending the outing early.
- Check the trip-date weather and current official alerts before leaving.
- Prepare binoculars, a dated observation sheet and a way to check wind at the field.
- Pack task-appropriate clothing, communication, lighting and required documents.
- Match recovery, handling and identification supplies to the planned visit.
- Count equipment, bags and waste materials before leaving the site.
- Sketch observed feeding groups separately from the assumed approach.
- Prepare a manageable first set of decoy groups with purposeful gaps.
- Inspect posture and orientation from a lawful outside viewpoint.
- Record one layout change and the next comparable observation.
Read the visible evidence
Look first. Which visible features support a description, and what remains hidden?
Representative photographs, not observations of your destination. Retain the original source and the uncertainty in each view.
Canada Goose · adult and brood
A representative photograph on water, not an autumn field arrangement.
Donna A. Dewhurst/USFWS · Photo source and licence · Public Domain (source record)
Compare the evidence and its limits
- Locate the adult’s black neck and pale cheek patch before considering the brown body.
- Compare the small goslings with the adult: age changes both plumage and proportions.
This single family view cannot teach distant flock identification, flight silhouettes or seasonal field behaviour.
Read the complete narration
Confirm the exact field arrangement
At the agreed entrance, confirm the parcel, people, activity, date and permission conditions. Parking, unloading and later recovery must fit the same arrangement. A familiar contact or old visit does not establish the current scope. Keep the return route and a contact method available before the group spreads out.
Does the arrangement cover the entire visit you are planning?
Read feeding groups and approach separately
From an authorized position, use binoculars to record feeding locations, small-group spacing and travel direction. Check whether the observation repeats. Wind at field level, vehicle access and keeping every group member accounted for are separate checks. None of those conditions can be read from a representative Canada Goose photograph.
Which observation supports your chosen working area?
Keep the groups loose and the working space clear
Start with manageable decoy groups and visible space between them. Inspect whether direction and posture match your observations. Preserve routes for people and recovery, keeping every part inside the agreed scope. More equipment can make adjustment and collection harder, so inspect the first arrangement before enlarging it.
Can you explain the purpose of every group and gap?
Diagnose before adding equipment
When travel patterns or visibility change, pause and record the evidence. Check wind direction, the group's visibility and the spread's appearance separately. Moving people or equipment calls for new access and recovery checks. Compare another observation without promising that a particular shape or call will determine the response.
What alternative explanation could account for the response?
Finish with complete records and recovery
Account for every person and item before leaving the permitted area. Link harvested birds to the correct person and handling record, checking current identification and transfer requirements before packaging. Save useful observations even when the expected pattern did not occur. Prepare the next visit from these facts and a new permission check.
Which observation should the next plan retain?
Record one observation, one change and one next task.
Canada Goose: two views do not automatically mean four birds
A fictional observer records two clear views through different landmarks. Individual identity between views has not been established.
Fictional teaching example, not a parcel sighting or current conditions report. Example times are not hunting-hour guidance.
Scroll across the table to compare each observation with its interpretation and next check.
| Time | Direct observation | Count and scope | Interpretation / uncertainty | Next check |
|---|---|---|---|---|
| Two Canada Goose are visible beside the first recorded landmark. | 2Observed count Two birds in the first view. | The view supports this count and species record; it does not establish the size of a wider group. | Keep the station and landmark with the observation. | |
| Two Canada Goose are visible again near the next landmark. | 2Observed count Two birds in the second view. | These may include the earlier birds. Adding 2 + 2 would not establish four unique individuals. | Write “possible repeat view” and keep the two observations separate. | |
| A section behind cover cannot be inspected from the observation station. | Unknown Ground not observed; no bird count obtained. | Unseen ground is unknown, even though two earlier views had counts. | Choose another checked station or leave that section explicitly unobserved. |
Counts belong to the stated view or sample. Repeated views may include the same animals; these rows are not summed into a unique population total.
A concrete next action
Compare positions, times and visibility before adjusting the next observation. Retain both counts without inventing a unique-bird total.
Pause and reflect
Can you report four unique Canada Goose from these notes?
Read the reasoning
No. The two counted views can contain the same individuals. Report each observation and the uncertainty about repeats; the hidden section remains unobserved.
Terms on this page
Open a term for its meaning, a common mix-up and the existing guide. English terms and acronyms are retained.
direct observation
What was actually seen, heard or measured, with the view and context recorded.
Common mix-up: A sound can be observed without confirming an animal’s identity or number.
inference
An explanation or estimate drawn from observations, rather than another separately observed fact.
Common mix-up: A confident file name, habitat label or repeated copy does not add a new observation.
sample coverage
The view or ground, and observation interval, that were actually checked for a particular record.
Common mix-up: Hidden or uninspected ground lies outside that checked sample, even when it is nearby.
Current checks and official context
Scope and final eligibility check
These intermediate lessons assume permission and preparation are complete and cover dry, harvested fields, not boats, ice or wetland access. Layouts and example equipment quantities are planning advice, not legal requirements or guaranteed results. The legal context was checked on November 1, 2026 for 2026–27; verify the rules again for your date, place and licence category.
Carry the applicable Saskatchewan game bird licence, Wildlife Habitat Certificate and federal MGBH Permit with its conservation stamp. People actively placing decoys, calling or retrieving also need an MGBH Permit; an observer is not automatically an authorised helper.
Calls, grain and non-toxic shot
Canada Goose lessons use mouth calls. Saskatchewan permits Snow Goose and Ross’s Goose recordings under the specified white-goose measures. In autumn, while actually hunting those geese with authorised recordings, other migratory species may be hunted only in their own open season. Spring white-goose measures do not open a Canada Goose season.
Use and possess only non-toxic shot during this waterfowl hunt. Never scatter feed or imitation feed to improve a spread. Normal harvest residue differs from bait; resolve suspected baiting and its restrictions before setting up.
Recovery and a clean departure
Have adequate recovery means immediately available, retrieve promptly and arrange access beyond the parcel beforehand. Do not use motor vehicles to pursue or hunt birds. Keep a fully feathered wing or head attached to unpreserved birds for identification; check tagging rules before another person transports them.
Wear gloves when handling birds, clean hands and equipment, and cool the harvest promptly. Keep dogs away from obviously sick birds or birds already found dead. Follow the linked handling guidance.
Pocket lesson card
Public teaching summary for review and offline reading. It contains no actual trip records, permissions, parcel conditions or coordinates. Use the full lesson and current official guidance for your own plan.
Save the HTML for offline text. Use your browser’s Print menu to print the opened card; online links require a connection.
Read the pocket card
Canada Goose · field preparation
Before leaving
- Sketch manageable decoy groups with purposeful open space.
- Separate observed feeding use from an assumed approach.
At the location
- Compare actual wind, visibility and position from a checked viewpoint.
- Change one layout feature; note the time and next comparable view.
Return
- Close the return check-in and collect equipment and waste.
- Retain the applicable bird-identification and transport records.
Review
- Choose one missing piece of evidence to check next time.
- Keep repeat views separate instead of inventing a unique-bird total.
A fictional observation example
Fictional example: two views each contain two Canada Goose. They may repeat the same birds; the notes do not establish four unique individuals.
Full reviewed lesson · onlineSource lesson editorial review: 2026-11-01
Turn this lesson into your next outing
Review the date, species, starting template and linked day plan in an editable preparation draft. You choose what to add and save.
Prepare your own trip
Review a preparation draftContinue learning
Waterfowl kit workshop: pack, test and reset a practical land-based loadTry a practical situation
The wind changes after setupOpening a draft does not create a saved checklist. A checked item records your own review, not permission or an open season.
Scenario practice
Put your field decisions into practice.
Try 24 situations across identification, access, field adjustments and harvest care. Compare your choice with the explanation, then revisit the relevant lesson.
Original sources
- Government of Saskatchewan · Waterfowl licences and habitat certificate
- Environment and Climate Change Canada · Saskatchewan 2026–27 migratory birds summary
- Environment and Climate Change Canada · Migratory game bird hunting FAQ
- Government of Canada · Migratory Birds Regulations, 2022
- Government of Saskatchewan · Avian influenza and handling wild birds
- Ducks Unlimited — Duck Scouting 101
- Ducks Unlimited — Decoy Spreads for Canada Geese
- Ducks Unlimited — Decoy Strategies for Geese
- Ducks Unlimited — 12 Tips for Hunting Geese
- Ducks Unlimited — Improve Your Decoys: 10 Expert Tips
- Ducks Unlimited — Get Moving for Geese
- Missouri Department of Conservation — Waterfowl Safety and Health
Use this as a planning guide. Check current official requirements and site conditions before travelling.
Help improve this guide
Tell the editor about something on this public page that needs attention.