
Guest reading progress stays in this browser and is not synchronized to your account automatically. Use the learning panel to include browser marks and save them explicitly. Clearing site data removes browser marks.
Your learning notebook
Save courses and review situations deliberately. Load your account records on another device when you want to continue.
Bookmarks and review choices stay in this browser until you load and save an account. Answers and time spent reading are not recorded.
Saved courses
Saved situations to revisit
Find your marked situations by title or topic, then open the original question and explanation.
Your review choices will appear here when this learning view is ready. Use the account controls above to load account choices.
No situations are marked for review in this learning view.
No saved situation matches these filters. Clear the search or choose all topics.
Identification practice
Land access practice
Field decisions practice
Harvest care practice
A Deer evidence ledger: review the animal before copying a licence category ↓
A Deer evidence ledger: review the animal before copying a licence category
Review three fictional sources with a companion: an obstructed field image, an observer-position note and a clear reference photograph of a different animal. Keep them separate. None supplies a complete identification and licence-category decision for the actual animal in the field note.
Original example. D1–D4 and Animal A/B are invented records, not locations or approvals. This exercise does not define a legal sex, age or harvest class. Check official wording and your actual licence separately. Observe from lawful positions; unresolved is a valid ending.
Describe, locate, compare, then state the limit
The observer, the animal and the captioned reference are three different things.
- Describe Animal A
Point to what this individual’s actual image records.
- Locate each source
Separate the observer’s position from the animal’s uncertain position.
- Compare honestly
Use a captioned reference to ask questions, not to fill hidden areas.
- Keep decisions separate
Species, licence class, place and dates each need their own support.
The ledger scrolls independently. Focus the table region and use arrow keys to compare the four columns.
| What the record actually contains | Limits of this view or source | What remains unknown | Next passive observation or review |
|---|---|---|---|
| D1 · Animal A’s front is visible; vegetation hides the rest. | Hidden regions cannot be described. | Unseen species and licence-relevant features. | Keep D1’s visible/unseen list; do not fill it from memory. |
| D2 · A phone marker records the observer. | The observer was not standing at the animal’s position. | Animal position, boundary context and table area. | Label the marker “observer”; describe the animal’s approximate landmark separately. |
| D3 · A captioned reference shows another animal. | This view belongs to the reference individual. | A’s features hidden in D1. | Prepare comparison questions; leave A’s unseen regions blank. |
| D4 · Another deer appears after A enters cover. | Continuity with A is unestablished. | The new Animal B’s identity. | Start B’s own record from the lawful viewpoint; keep A unresolved. |
Replace “the deer at my pin matches this licence” with separate statements: observer position recorded; Animal A seen beyond it; view incomplete; species and the relevant licence conditions remain unresolved. This preserves a useful record without inventing animal, location or eligibility evidence.
Review the sources before reviewing the answer
- Separate field image, observer note and reference. Ask for the source of every claim. Statements without a source belong in questions, not observations.
- Cover the reference caption, describe visible features, then restore it and check. This habit does not transfer the reference animal’s identity, sex or age to Animal A.
- Read licence wording and the current table separately. Distinguish conditions needing animal evidence, place/date checks and personal documents. Leave unresolved conditions unresolved instead of copying a convenient category.
Three mistakes to catch before the next outing
The image does not show a feature. Does that establish that the feature is absent?
No. “Not visible in D1” describes the source’s limit. “Absent on Animal A” is a different claim. Obstruction, angle or image quality can support the first while leaving the second unknown.
Keep the original wording. Do not infer a legal sex, age or harvest class from an unseen region. Ask an instructor how the official category is defined and what actual evidence would be needed.
The observer marker is inside a known parcel. Does it locate the animal there?
The marker records the observer, not everything visible. Here the animal has only an uncertain landmark description. Copying the observer’s parcel or WMZ to it would erase that limit.
Keep the locations separate. Resolve relevant official boundaries and access before planning another viewpoint. Preserve approximate animal location without turning it into an exact point or a permitted destination.
A clear reference has a species caption. Can its category be copied to the field note?
The caption explains the reference animal, not Animal A or B. Agreement from the same reference adds no new field view. Keep image provenance with the comparison.
Ask which visible information belongs to the actual animal. If needed regions stay hidden, retain the unresolved record and choose a specific home exercise. A successful reference comparison and an eligible real hunting situation are different outcomes.
Identification and current-rule references
Real reference photograph. Compare several visible features with the full lesson; one photograph does not cover every age, sex, plumage or viewing angle. Resized and WebP encoded without cropping.
Image credit: D. Gordon E. Robertson · CC BY-SA 3.0 · View image source · CC BY-SA 3.0What you will learn
- Compare tail, rump and head proportions in a complete view.
- Recognise the limits of ear size, antlers and coat colour.
- Keep identity, observation location and hunting requirements as separate records.
An original SKHunter learning guide
Compare the photographs
Before opening the notes, describe the features you can actually see. Compare the views without treating their displayed sizes as a common scale.
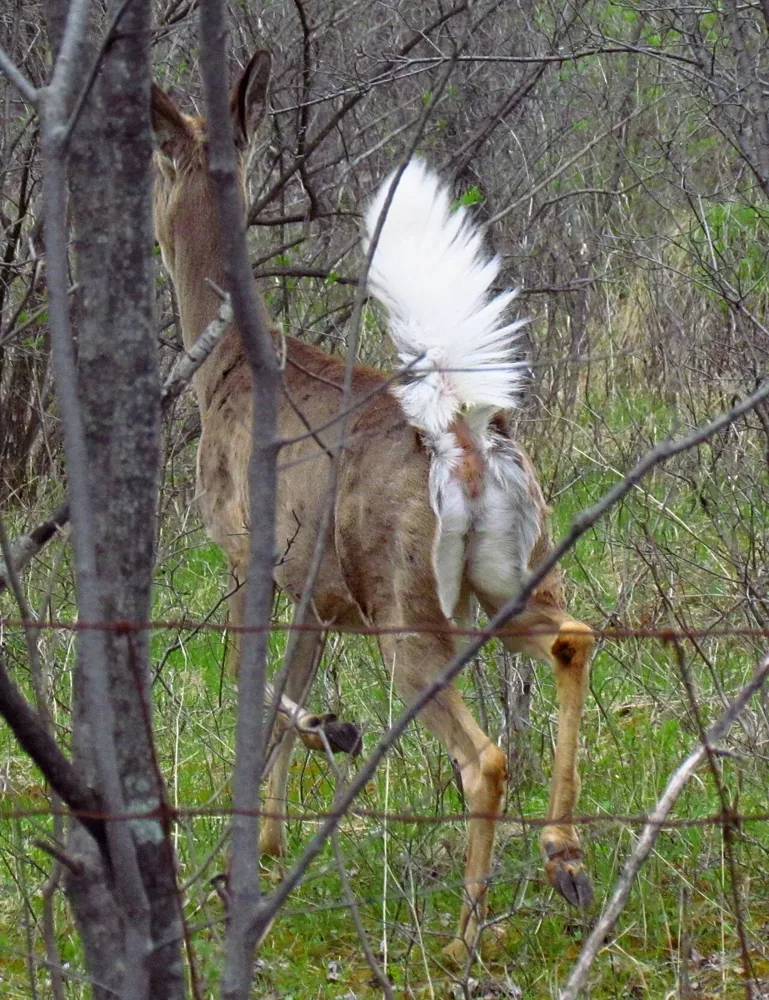
White-tailed Deer · raised tail
A female photographed from behind in Ontario, Canada.
Reveal observation notes
What this view lets you examine
- Observe the broad white underside of the raised tail.
- Describe its shape before comparing the other animal’s lowered tail.
Limits of this view
Branches partly hide the head and body. This is a tail comparison, not a complete head or whole-body identification view.
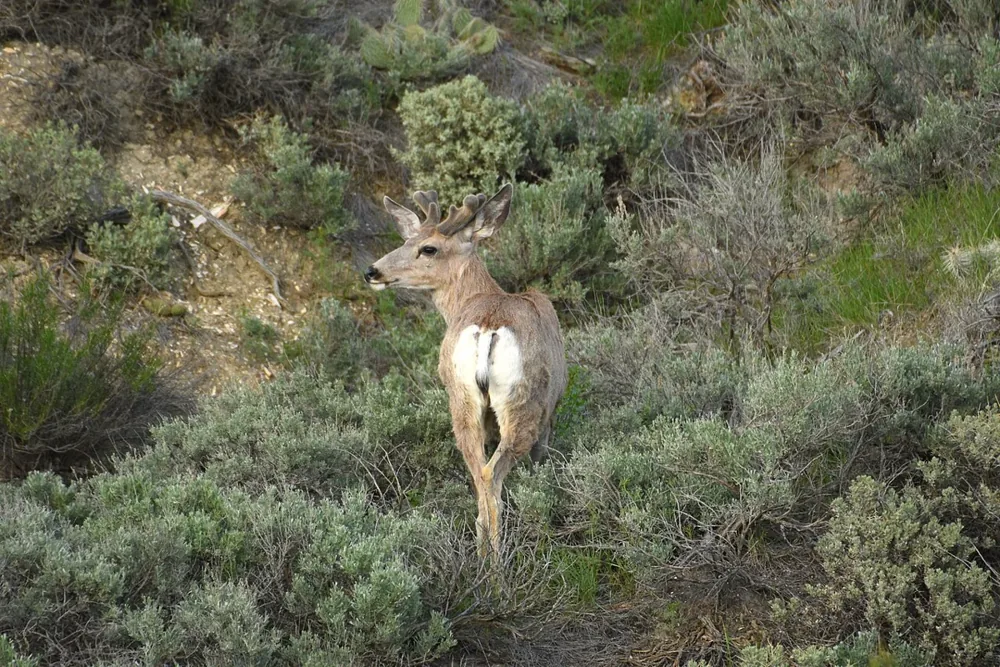
Mule Deer · rear-quarter view
A young male with the rump and lowered tail visible.
Reveal observation notes
What this view lets you examine
- Trace the narrow tail and its dark tip against the pale rump.
- Notice the visible ears as a supporting feature, not a separate test.
Limits of this view
The tail is lowered, unlike the White-tailed Deer image. Separate photographs, age and pose prevent direct size comparison.
Create a feature checklist before naming the deer
Use two well-captioned reference photographs, one White-tailed Deer and one Mule Deer, then add a second angle for each. Draw a small checklist: whole body visible, tail shape, rump, head/ears, antlers if present and hidden areas. First describe the animal without the species caption. This keeps memory from painting a missing feature into the view.
Make your practice partner ask “where can you see that?” for each statement. Point to the actual feature or change the note to unseen. Practise with an antlerless animal as well as an antlered one. A method that needs a perfect mature buck photograph is not enough for the views encountered on an ordinary outing.
Start the comparison at the tail and rump
White-tailed Deer has a broad tail with a white underside that becomes prominent when raised. Mule Deer has a narrower, black-tipped tail and a pale rump. The useful comparison is the visible tail’s shape and pattern together, not simply whether something white flashes through vegetation. A lowered or hidden tail may remove much of your evidence.
On a reference photograph, cover the antlers and ask whether you can still support the identification from the rear and whole outline. Then cover the rear and record what is lost. In a field note, say “tail hidden by grass” rather than “probably broad”. Keep an incomplete observation incomplete when the animal walks away.
Use ears and antlers as supporting evidence
Mule Deer commonly shows large ears relative to its head. Mature antlers often fork, while mature White-tailed Deer typically has tines coming from a main beam. Age, individual variation and an oblique angle complicate these patterns. The apparent size of a distant ear is especially easy to exaggerate when only the head appears above cover.
Compare a front view with a side view of the same species. Write which proportions are distorted by perspective. Do not use point count or a partial antler branch as a species test, and do not infer sex or a licence category from what you cannot see. Return to tail, rump and full body evidence whenever the view allows it.
Practise with obstructions rather than chasing a better view
Use a photograph cropped at the rear or partly screened by vegetation, and write a deliberately limited description. At the observation site, use binoculars from a lawful location and allow the animal to move naturally. Keep the observer’s position separate from the animal’s approximate position across a draw or fence.
A map pin at your phone records where you stood. Attach a landmark and an uncertainty note to the animal observation instead of assigning it automatically to your own parcel. If you need to change viewpoint, check the entire approach first. The desire for another angle does not resolve a boundary or access question.
Finish with an evidence card and a separate requirements check
Use a four-line card: what I saw, what I could not see, my supported identification or uncertainty, and what would resolve it. Review the card against the source photograph or a knowledgeable mentor afterwards. Keep an example where the right answer was “not enough visible” alongside successful identifications.
For an actual hunting plan, species recognition is only one input. Use current Saskatchewan material to check species, WMZ, licence category, applicable sex/age conditions and dates. Do not treat an identification exercise, a saved sighting or a neighbouring animal’s identity as an approval. If those independent checks cannot be completed, keep the outing to observation or end the attempt.
Practice case: large ears above a fence
A deer’s head and antlers are visible beyond a fence. The body, rump and tail are hidden; the phone’s map pin is on your side.
Put it into practice
- Record a deer observation and describe only the visible head and antlers.
- Keep large-looking ears as a clue, not a confirmed species.
- Save your observer position separately from the animal’s approximate location.
- Wait only from a lawful viewpoint; retain uncertainty if the useful whole-animal view never arrives.
Common mistakes to avoid
One white flash proves White-tailed Deer
Tail shape, its orientation and the rest of the animal still matter.
Antler points or ear size settle everything
Age, variation and perspective weaken single-feature decisions.
A confident species name resolves the whole outing
Access, location, licence conditions and dates remain separate checks.
Only a deer’s head is visible, and its ears appear large. What is the best record?
- Confirmed Mule Deer.
- Deer, with the visible head described and species still uncertain.
- Confirmed White-tailed Deer because the tail cannot be seen.
Show the answer and explanation
Answer: B. Deer, with the visible head described and species still uncertain.
An honest description preserves useful evidence. Missing tail and body features cannot be supplied by the apparent size of the ears.
Current checks and official context
How to use the references
The biological references explain visible features and variation. Their photographs and captions can support further practice; U.S. pages do not supply Saskatchewan hunting rules.
Before turning recognition into a hunting plan
Use the current official Saskatchewan material for the actual species, person, place, date and activity. The lesson provides no independent determination of eligibility or an open season.
Turn this lesson into your next outing
Review the date, species, starting template and linked day plan in an editable preparation draft. You choose what to add and save.
Prepare your own trip
Review a preparation draftContinue learning
Plan CWD testing before your big-game tripTry a practical situation
One photograph, two conflicting recordsOpening a draft does not create a saved checklist. A checked item records your own review, not permission or an open season.
Scenario practice
Put your field decisions into practice.
Try 24 situations across identification, access, field adjustments and harvest care. Compare your choice with the explanation, then revisit the relevant lesson.
Original sources
- U.S. National Park Service · White-tailed Deer and Mule Deer
- Minnesota DNR · Deer and Elk identification (biology reference)
- Idaho Fish and Game · Mule Deer or White-tailed Deer (biology reference)
- Government of Saskatchewan · Current Hunters Guide and updates
Use this as a planning guide. Check current official requirements and site conditions before travelling.
Help improve this guide
Tell the editor about something on this public page that needs attention.